State Management with BLoC Pattern in Flutter
State management is one of the most critical aspects of Flutter development. Among various state management solutions, the BLoC (Business Logic Component) pattern has emerged as a powerful and scalable approach. Let's explore how BLoC can transform your Flutter applications.
What is BLoC?
BLoC stands for Business Logic Component. It's a design pattern that separates business logic from the UI layer, making your code more testable, reusable, and maintainable. The pattern uses Streams to handle data flow and state changes.
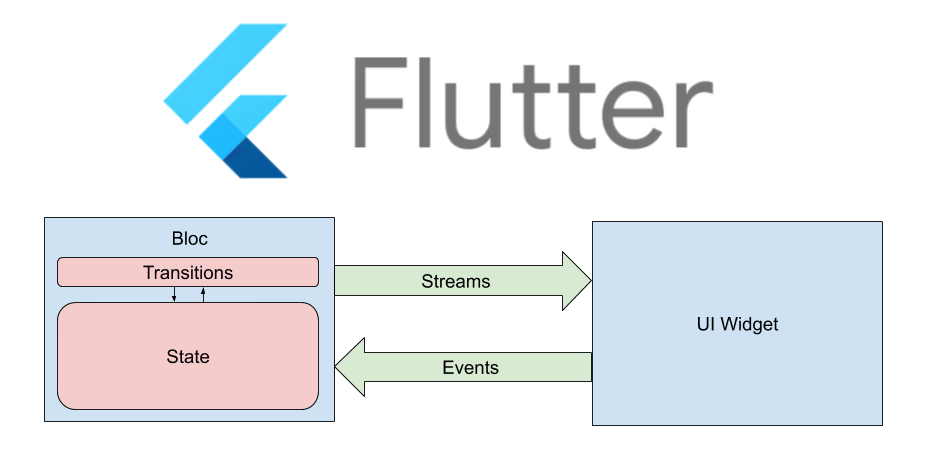
BLoC Architecture: Separating UI from Business Logic
Why Choose BLoC?
BLoC offers several advantages that make it stand out among state management solutions:
- Separation of Concerns: Business logic is completely separated from UI code
- Testability: Easy to write unit tests for business logic without UI dependencies
- Reusability: BLoCs can be shared across multiple widgets and screens
- Predictability: Unidirectional data flow makes state changes predictable
- Platform Independence: BLoC logic can be shared between Flutter Web, Mobile, and Desktop
Getting Started with BLoC
First, add the BLoC package to your pubspec.yaml:
dependencies:
  flutter_bloc: ^8.1.3
  equatable: ^2.0.5
Core Concepts
1. Events
Events are inputs to the BLoC. They represent user actions or system events that trigger state changes. Here's how to define events:
abstract class CounterEvent extends Equatable {
  const CounterEvent();

  @override
  List<Object> get props => [];
}

class IncrementEvent extends CounterEvent {}

class DecrementEvent extends CounterEvent {}

class ResetEvent extends CounterEvent {}
2. States
States represent the output of the BLoC. They describe the current condition of your application:
class CounterState extends Equatable {
  final int count;
  final bool isLoading;

  const CounterState({
    this.count = 0,
    this.isLoading = false,
  });

  CounterState copyWith({
    int? count,
    bool? isLoading,
  }) {
    return CounterState(
      count: count ?? this.count,
      isLoading: isLoading ?? this.isLoading,
    );
  }

  @override
  List<Object> get props => [count, isLoading];
}
3. Creating a BLoC
Now let's create the BLoC that connects events to states:
class CounterBloc extends Bloc<CounterEvent, CounterState> {
  CounterBloc() : super(const CounterState()) {
    on<IncrementEvent>(_onIncrement);
    on<DecrementEvent>(_onDecrement);
    on<ResetEvent>(_onReset);
  }

  void _onIncrement(IncrementEvent event, Emitter<CounterState> emit) {
    emit(state.copyWith(count: state.count + 1));
  }

  void _onDecrement(DecrementEvent event, Emitter<CounterState> emit) {
    emit(state.copyWith(count: state.count - 1));
  }

  void _onReset(ResetEvent event, Emitter<CounterState> emit) {
    emit(const CounterState());
  }
}
BLoC Architecture Flow
The BLoC pattern follows a unidirectional data flow:
- UI Layer: User interacts with the UI and triggers an event
- Event: The event is sent to the BLoC
- BLoC: Processes the event and executes business logic
- State: BLoC emits a new state based on the result
- UI Update: UI rebuilds based on the new state
Key Components
BlocProvider
BlocProvider is a widget that provides a BLoC to its children. It handles the creation and disposal of the BLoC automatically:
void main() {
  runApp(
    BlocProvider(
      create: (context) => CounterBloc(),
      child: MyApp(),
    ),
  );
}
BlocBuilder
BlocBuilder is a widget that rebuilds in response to new states:
BlocBuilder<CounterBloc, CounterState>(
  builder: (context, state) {
    return Text(
      '${state.count}',
      style: Theme.of(context).textTheme.headline4,
    );
  },
)
BlocListener
BlocListener is used for side effects like navigation or showing snackbars:
BlocListener<CounterBloc, CounterState>(
  listener: (context, state) {
    if (state.count == 10) {
      ScaffoldMessenger.of(context).showSnackBar(
        SnackBar(content: Text('You reached 10!')),
      );
    }
  },
  child: Container(),
)
BlocConsumer
BlocConsumer combines BlocBuilder and BlocListener:
BlocConsumer<CounterBloc, CounterState>(
  listener: (context, state) {
    if (state.count == 10) {
      ScaffoldMessenger.of(context).showSnackBar(
        SnackBar(content: Text('You reached 10!')),
      );
    }
  },
  builder: (context, state) {
    return Text('${state.count}');
  },
)
Complete Example: Counter App
Here's a complete example putting it all together:
class CounterPage extends StatelessWidget {
  @override
  Widget build(BuildContext context) {
    return Scaffold(
      appBar: AppBar(title: Text('BLoC Counter')),
      body: Center(
        child: BlocBuilder<CounterBloc, CounterState>(
          builder: (context, state) {
            return Column(
              mainAxisAlignment: MainAxisAlignment.center,
              children: [
                Text(
                  'Counter Value:',
                  style: TextStyle(fontSize: 20),
                ),
                Text(
                  '${state.count}',
                  style: TextStyle(
                    fontSize: 48,
                    fontWeight: FontWeight.bold,
                  ),
                ),
                SizedBox(height: 20),
                Row(
                  mainAxisAlignment: MainAxisAlignment.center,
                  children: [
                    FloatingActionButton(
                      onPressed: () {
                        context.read<CounterBloc>()
                            .add(DecrementEvent());
                      },
                      child: Icon(Icons.remove),
                    ),
                    SizedBox(width: 20),
                    FloatingActionButton(
                      onPressed: () {
                        context.read<CounterBloc>()
                            .add(IncrementEvent());
                      },
                      child: Icon(Icons.add),
                    ),
                  ],
                ),
              ],
            );
          },
        ),
      ),
      floatingActionButton: FloatingActionButton(
        onPressed: () {
          context.read<CounterBloc>().add(ResetEvent());
        },
        child: Icon(Icons.refresh),
      ),
    );
  }
}
Real-World Example: API Call with BLoC
Let's see a more practical example with API calls:
// Events
abstract class UserEvent extends Equatable {
  @override
  List<Object> get props => [];
}

class FetchUserEvent extends UserEvent {}

// States
abstract class UserState extends Equatable {
  @override
  List<Object> get props => [];
}

class UserInitial extends UserState {}

class UserLoading extends UserState {}

class UserLoaded extends UserState {
  final User user;
  UserLoaded(this.user);

  @override
  List<Object> get props => [user];
}

class UserError extends UserState {
  final String message;
  UserError(this.message);

  @override
  List<Object> get props => [message];
}

// BLoC
class UserBloc extends Bloc<UserEvent, UserState> {
  final UserRepository repository;

  UserBloc(this.repository) : super(UserInitial()) {
    on<FetchUserEvent>(_onFetchUser);
  }

  Future<void> _onFetchUser(
    FetchUserEvent event,
    Emitter<UserState> emit,
  ) async {
    emit(UserLoading());
    try {
      final user = await repository.fetchUser();
      emit(UserLoaded(user));
    } catch (e) {
      emit(UserError(e.toString()));
    }
  }
}
Using the API BLoC in UI
class UserProfilePage extends StatelessWidget {
  @override
  Widget build(BuildContext context) {
    return Scaffold(
      appBar: AppBar(title: Text('User Profile')),
      body: BlocBuilder<UserBloc, UserState>(
        builder: (context, state) {
          if (state is UserLoading) {
            return Center(child: CircularProgressIndicator());
          } else if (state is UserLoaded) {
            return Center(
              child: Column(
                mainAxisAlignment: MainAxisAlignment.center,
                children: [
                  Text('Name: ${state.user.name}'),
                  Text('Email: ${state.user.email}'),
                ],
              ),
            );
          } else if (state is UserError) {
            return Center(child: Text('Error: ${state.message}'));
          }
          return Center(child: Text('Press button to load user'));
        },
      ),
      floatingActionButton: FloatingActionButton(
        onPressed: () {
          context.read<UserBloc>().add(FetchUserEvent());
        },
        child: Icon(Icons.refresh),
      ),
    );
  }
}
Best Practices
- Single Responsibility: Each BLoC should handle one specific feature or domain
- Immutable States: Always use immutable state classes with Equatable
- Event Naming: Use clear, action-based names for events (e.g.,
LoginButtonPressed) - State Naming: Use descriptive names that reflect the state (e.g.,
LoginLoading,LoginSuccess) - Error Handling: Always include error states and handle them gracefully
- Testing: Write comprehensive unit tests for your BLoCs
Testing Your BLoC
One of BLoC's biggest advantages is testability. Here's how to test it:
void main() {
  group('CounterBloc', () {
    late CounterBloc counterBloc;

    setUp(() {
      counterBloc = CounterBloc();
    });

    tearDown(() {
      counterBloc.close();
    });

    test('initial state is CounterState with count 0', () {
      expect(counterBloc.state, CounterState(count: 0));
    });

    blocTest<CounterBloc, CounterState>(
      'emits [CounterState(count: 1)] when IncrementEvent is added',
      build: () => counterBloc,
      act: (bloc) => bloc.add(IncrementEvent()),
      expect: () => [CounterState(count: 1)],
    );

    blocTest<CounterBloc, CounterState>(
      'emits [CounterState(count: -1)] when DecrementEvent is added',
      build: () => counterBloc,
      act: (bloc) => bloc.add(DecrementEvent()),
      expect: () => [CounterState(count: -1)],
    );
  });
}
BLoC vs Other State Management Solutions
BLoC vs Provider
Provider is simpler and has less boilerplate, but BLoC offers better separation of concerns and is more suitable for complex applications with heavy business logic.
BLoC vs Riverpod
Riverpod is more flexible and has compile-time safety, while BLoC provides a more structured approach with clear patterns for events and states.
BLoC vs GetX
GetX is lightweight and easy to learn, but BLoC is more testable and follows established design patterns, making it better for large-scale applications.
When to Use BLoC?
BLoC is ideal for:
- Large-scale applications with complex business logic
- Projects requiring high testability
- Teams that value structured architecture
- Applications that need to share logic across platforms
- Projects with multiple developers working on the same codebase
Conclusion
The BLoC pattern is a powerful state management solution that brings structure, testability, and scalability to Flutter applications. While it has a steeper learning curve compared to simpler solutions, the benefits become clear as your application grows.
By separating business logic from UI, BLoC makes your code more maintainable and easier to test. If you're building a production-ready Flutter app, especially one with complex requirements, BLoC is definitely worth considering.
Blog List