Flutter에서 BLoC 패턴을 사용한 상태 관리
상태 관리는 Flutter 개발에서 가장 중요한 측면 중 하나입니다. 다양한 상태 관리 솔루션 중에서 BLoC(Business Logic Component) 패턴은 강력하고 확장 가능한 접근 방식으로 부상했습니다. BLoC가 어떻게 Flutter 애플리케이션을 변화시킬 수 있는지 살펴보겠습니다.
BLoC란 무엇인가?
BLoC stands for Business Logic Component. It's a design pattern that separates business logic from the UI layer, making your code more testable, reusable, and maintainable. The pattern uses Streams to handle data flow and state changes.
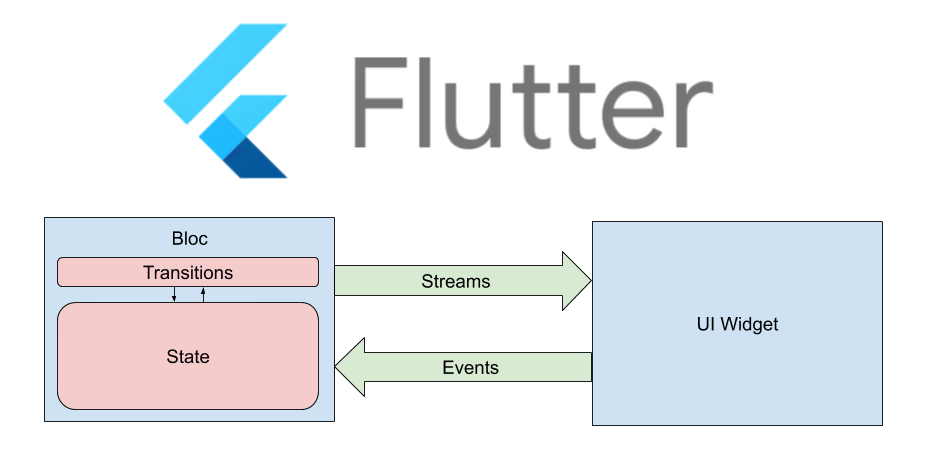
BLoC Architecture: Separating UI from Business Logic
왜 BLoC를 선택해야 하나요?
BLoC는 다른 상태 관리 솔루션들 사이에서 두드러지는 여러 장점을 제공합니다:
- 관심사의 분리: 비즈니스 로직이 UI 코드에서 완전히 분리됩니다
- 테스트 가능성: UI 의존성 없이 비즈니스 로직에 대한 단위 테스트를 쉽게 작성할 수 있습니다
- 재사용성: BLoC는 여러 위젯과 화면에서 공유될 수 있습니다
- 예측 가능성: 단방향 데이터 흐름으로 상태 변경을 예측 가능하게 만듭니다
- 플랫폼 독립성: BLoC 로직은 Flutter Web, Mobile, Desktop 간에 공유될 수 있습니다
BLoC 시작하기
First, add the BLoC package to your pubspec.yaml:
dependencies:
  flutter_bloc: ^8.1.3
  equatable: ^2.0.5
핵심 개념
1. 이벤트 (Events)
이벤트는 BLoC에 대한 입력입니다. 상태 변경을 트리거하는 사용자 액션이나 시스템 이벤트를 나타냅니다. 이벤트를 정의하는 방법은 다음과 같습니다:
abstract class CounterEvent extends Equatable {
  const CounterEvent();

  @override
  List<Object> get props => [];
}

class IncrementEvent extends CounterEvent {}

class DecrementEvent extends CounterEvent {}

class ResetEvent extends CounterEvent {}
2. 상태 (States)
상태는 BLoC의 출력을 나타냅니다. 애플리케이션의 현재 상황을 설명합니다:
class CounterState extends Equatable {
  final int count;
  final bool isLoading;

  const CounterState({
    this.count = 0,
    this.isLoading = false,
  });

  CounterState copyWith({
    int? count,
    bool? isLoading,
  }) {
    return CounterState(
      count: count ?? this.count,
      isLoading: isLoading ?? this.isLoading,
    );
  }

  @override
  List<Object> get props => [count, isLoading];
}
3. BLoC 생성하기
이제 이벤트와 상태를 연결하는 BLoC를 만들어봅시다:
class CounterBloc extends Bloc<CounterEvent, CounterState> {
  CounterBloc() : super(const CounterState()) {
    on<IncrementEvent>(_onIncrement);
    on<DecrementEvent>(_onDecrement);
    on<ResetEvent>(_onReset);
  }

  void _onIncrement(IncrementEvent event, Emitter<CounterState> emit) {
    emit(state.copyWith(count: state.count + 1));
  }

  void _onDecrement(DecrementEvent event, Emitter<CounterState> emit) {
    emit(state.copyWith(count: state.count - 1));
  }

  void _onReset(ResetEvent event, Emitter<CounterState> emit) {
    emit(const CounterState());
  }
}
BLoC 아키텍처 흐름
BLoC 패턴은 단방향 데이터 흐름을 따릅니다:
- UI 레이어: 사용자가 UI와 상호작용하고 이벤트를 트리거합니다
- 이벤트: 이벤트가 BLoC로 전송됩니다
- BLoC: 이벤트를 처리하고 비즈니스 로직을 실행합니다
- 상태: BLoC가 결과에 따라 새로운 상태를 방출합니다
- UI 업데이트: 새로운 상태에 따라 UI가 재구성됩니다
주요 컴포넌트
BlocProvider
BlocProvider는 자식 위젯들에게 BLoC를 제공하는 위젯입니다. BLoC의 생성과 폐기를 자동으로 처리합니다:
void main() {
  runApp(
    BlocProvider(
      create: (context) => CounterBloc(),
      child: MyApp(),
    ),
  );
}
BlocBuilder
BlocBuilder는 새로운 상태에 반응하여 재구성되는 위젯입니다:
BlocBuilder<CounterBloc, CounterState>(
  builder: (context, state) {
    return Text(
      '${state.count}',
      style: Theme.of(context).textTheme.headline4,
    );
  },
)
BlocListener
BlocListener는 네비게이션이나 스낵바 표시와 같은 부수 효과에 사용됩니다:
BlocListener<CounterBloc, CounterState>(
  listener: (context, state) {
    if (state.count == 10) {
      ScaffoldMessenger.of(context).showSnackBar(
        SnackBar(content: Text('10에 도달했습니다!')),
      );
    }
  },
  child: Container(),
)
BlocConsumer
BlocConsumer는 BlocBuilder와 BlocListener를 결합합니다:
BlocConsumer<CounterBloc, CounterState>(
  listener: (context, state) {
    if (state.count == 10) {
      ScaffoldMessenger.of(context).showSnackBar(
        SnackBar(content: Text('10에 도달했습니다!')),
      );
    }
  },
  builder: (context, state) {
    return Text('${state.count}');
  },
)
완전한 예제: 카운터 앱
모든 것을 종합한 완전한 예제입니다:
class CounterPage extends StatelessWidget {
  @override
  Widget build(BuildContext context) {
    return Scaffold(
      appBar: AppBar(title: Text('BLoC 카운터')),
      body: Center(
        child: BlocBuilder<CounterBloc, CounterState>(
          builder: (context, state) {
            return Column(
              mainAxisAlignment: MainAxisAlignment.center,
              children: [
                Text(
                  '카운터 값:',
                  style: TextStyle(fontSize: 20),
                ),
                Text(
                  '${state.count}',
                  style: TextStyle(
                    fontSize: 48,
                    fontWeight: FontWeight.bold,
                  ),
                ),
                SizedBox(height: 20),
                Row(
                  mainAxisAlignment: MainAxisAlignment.center,
                  children: [
                    FloatingActionButton(
                      onPressed: () {
                        context.read<CounterBloc>()
                            .add(DecrementEvent());
                      },
                      child: Icon(Icons.remove),
                    ),
                    SizedBox(width: 20),
                    FloatingActionButton(
                      onPressed: () {
                        context.read<CounterBloc>()
                            .add(IncrementEvent());
                      },
                      child: Icon(Icons.add),
                    ),
                  ],
                ),
              ],
            );
          },
        ),
      ),
      floatingActionButton: FloatingActionButton(
        onPressed: () {
          context.read<CounterBloc>().add(ResetEvent());
        },
        child: Icon(Icons.refresh),
      ),
    );
  }
}
실전 예제: API 호출과 BLoC
API 호출을 사용하는 더 실용적인 예제를 살펴봅시다:
// 이벤트
abstract class UserEvent extends Equatable {
  @override
  List<Object> get props => [];
}

class FetchUserEvent extends UserEvent {}

// 상태
abstract class UserState extends Equatable {
  @override
  List<Object> get props => [];
}

class UserInitial extends UserState {}

class UserLoading extends UserState {}

class UserLoaded extends UserState {
  final User user;
  UserLoaded(this.user);

  @override
  List<Object> get props => [user];
}

class UserError extends UserState {
  final String message;
  UserError(this.message);

  @override
  List<Object> get props => [message];
}

// BLoC
class UserBloc extends Bloc<UserEvent, UserState> {
  final UserRepository repository;

  UserBloc(this.repository) : super(UserInitial()) {
    on<FetchUserEvent>(_onFetchUser);
  }

  Future<void> _onFetchUser(
    FetchUserEvent event,
    Emitter<UserState> emit,
  ) async {
    emit(UserLoading());
    try {
      final user = await repository.fetchUser();
      emit(UserLoaded(user));
    } catch (e) {
      emit(UserError(e.toString()));
    }
  }
}
UI에서 API BLoC 사용하기
class UserProfilePage extends StatelessWidget {
  @override
  Widget build(BuildContext context) {
    return Scaffold(
      appBar: AppBar(title: Text('사용자 프로필')),
      body: BlocBuilder<UserBloc, UserState>(
        builder: (context, state) {
          if (state is UserLoading) {
            return Center(child: CircularProgressIndicator());
          } else if (state is UserLoaded) {
            return Center(
              child: Column(
                mainAxisAlignment: MainAxisAlignment.center,
                children: [
                  Text('이름: ${state.user.name}'),
                  Text('이메일: ${state.user.email}'),
                ],
              ),
            );
          } else if (state is UserError) {
            return Center(child: Text('오류: ${state.message}'));
          }
          return Center(child: Text('버튼을 눌러 사용자 로드'));
        },
      ),
      floatingActionButton: FloatingActionButton(
        onPressed: () {
          context.read<UserBloc>().add(FetchUserEvent());
        },
        child: Icon(Icons.refresh),
      ),
    );
  }
}
모범 사례
- 단일 책임: 각 BLoC는 하나의 특정 기능이나 도메인을 처리해야 합니다
- 불변 상태: 항상 Equatable과 함께 불변 상태 클래스를 사용하세요
- 이벤트 명명: 이벤트에 명확하고 액션 기반의 이름을 사용하세요 (예:
LoginButtonPressed) - 상태 명명: 상태를 반영하는 설명적인 이름을 사용하세요 (예:
LoginLoading,LoginSuccess) - 오류 처리: 항상 오류 상태를 포함하고 우아하게 처리하세요
- 테스팅: BLoC에 대한 포괄적인 단위 테스트를 작성하세요
BLoC 테스트하기
BLoC의 가장 큰 장점 중 하나는 테스트 가능성입니다. 테스트 방법은 다음과 같습니다:
void main() {
  group('CounterBloc', () {
    late CounterBloc counterBloc;

    setUp(() {
      counterBloc = CounterBloc();
    });

    tearDown(() {
      counterBloc.close();
    });

    test('초기 상태는 count가 0인 CounterState', () {
      expect(counterBloc.state, CounterState(count: 0));
    });

    blocTest<CounterBloc, CounterState>(
      'IncrementEvent 추가 시 [CounterState(count: 1)] 방출',
      build: () => counterBloc,
      act: (bloc) => bloc.add(IncrementEvent()),
      expect: () => [CounterState(count: 1)],
    );

    blocTest<CounterBloc, CounterState>(
      'DecrementEvent 추가 시 [CounterState(count: -1)] 방출',
      build: () => counterBloc,
      act: (bloc) => bloc.add(DecrementEvent()),
      expect: () => [CounterState(count: -1)],
    );
  });
}
BLoC vs 다른 상태 관리 솔루션
BLoC vs Provider
Provider는 더 간단하고 보일러플레이트가 적지만, BLoC는 더 나은 관심사 분리를 제공하며 복잡한 비즈니스 로직이 있는 복잡한 애플리케이션에 더 적합합니다.
BLoC vs Riverpod
Riverpod는 더 유연하고 컴파일 타임 안전성을 가지고 있지만, BLoC는 이벤트와 상태에 대한 명확한 패턴으로 더 구조화된 접근 방식을 제공합니다.
BLoC vs GetX
GetX는 가볍고 배우기 쉽지만, BLoC는 더 테스트 가능하고 확립된 디자인 패턴을 따르므로 대규모 애플리케이션에 더 적합합니다.
언제 BLoC를 사용해야 하나요?
BLoC는 다음과 같은 경우에 이상적입니다:
- 복잡한 비즈니스 로직이 있는 대규모 애플리케이션
- 높은 테스트 가능성이 필요한 프로젝트
- 구조화된 아키텍처를 중요시하는 팀
- 플랫폼 간 로직 공유가 필요한 애플리케이션
- 동일한 코드베이스에서 여러 개발자가 작업하는 프로젝트
결론
BLoC 패턴은 Flutter 애플리케이션에 구조, 테스트 가능성, 확장성을 제공하는 강력한 상태 관리 솔루션입니다. 더 간단한 솔루션에 비해 학습 곡선이 가파르지만, 애플리케이션이 성장함에 따라 그 이점이 명확해집니다.
비즈니스 로직을 UI에서 분리함으로써 BLoC는 코드를 더 유지보수하기 쉽고 테스트하기 쉽게 만듭니다. 특히 복잡한 요구사항이 있는 프로덕션 준비 Flutter 앱을 구축하는 경우, BLoC는 확실히 고려할 가치가 있습니다.
블로그 목록